Imagining our space

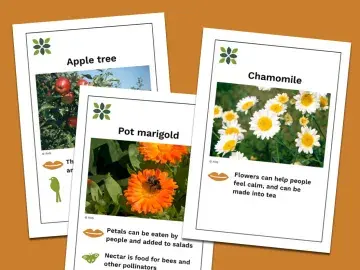
This activity supports younger learners to understand their role in caring for and developing their outdoor space, valuing both the needs of wildlife and each other. Learners will explore different ways of supporting nature on site, using this creative activity to propose different ideas on a map. Ideas may be nature-based solutions such as a rain garden, or creating habitats by planting flowers or trees.

Prior to this activity, it is helpful if learners have already explored their site and taken notice of what is already there, or not there. Use X marks the spot to orientate learners in their outdoor space, or Garden Detectives to recognise where there could be more spaces for nature. Guess the habitat will introduce the concept of habitats and what wildlife might live where. 

Making decisions

< 30 minutes
EYFS

Preparation

Before beginning this activity, you will need to create a ‘map’ of your outdoor space. This can be downloaded from online, or, if you have mapped your site boundary on the National Education Nature Park, this can be used. Some large features such as trees, raised beds, benches, can be added to the map to help learners navigate around their grounds. 

What you need
  • Map outlining your grounds
  • ‘The Extraordinary Gardener’ by Sam Boughton
  • Interventions image cards (you could add more images of other interventions if desired)
  • Glue sticks, masking tape or other adhesive to secure images to map  
Curriculum links
  • Understanding the World
  • Communication and Language
Location

Indoors or outdoors

Useful guidance

Step by step

  1. Start by reading ‘The Extraordinary Gardener’ by Sam Boughton. (If you don’t have this book, you may be able to find a free reading of it online, or select a book with similar themes – take a look at our Nature library catalogue for examples.) Encourage learners to look closely at the images and describe what they see throughout the story.
  2. After reading, open a discussion with the group or in pairs: “How did Joe’s garden change during the story?” “How could we create a space like this?”
  3. Introduce the map to learners and ask if they can recognise what it is. Run through key points or areas on the map, showing them where they are and helping them orientate themselves. (If you have already completed X marks the spot, learners may be familiar with this.)
  4. Introduce the images of the different interventions (or ‘changes’), and hand out a set to each learner, or per small group or pair. Ask what each of the images are. Did we see it in the book? Do we have it in our site already? What wildlife might live there?  
  5. Ask learners to think about which changes they would like to see where, and add the picture onto the map. Ask why they have placed each image in that location – would it work here? Is there something here already? Why would it be helpful here?  
  6. Once all images have been added to the map, invite learners to evaluate their choices from different perspectives. “Which change would bees and butterflies like the best? Which would birds like the best? Which would the teachers like best? Or your friends?”

Reflection

Which interventions do we like the best? Where is the best place for it in our site? What nature would it attract/help?

Thumbnail image: © RHS, Credit: RHS / Trevor Ray Hart