Create your site boundary
The site boundary creator tool allows you to place your setting on the Nature Park map.
This is a computer-based activity for educators to complete, as part of your preparation before getting young people involved in exploring and mapping habitats. In this short activity, you will draw the boundary of your educational setting directly onto the Nature Park’s map of England. By completing this task:
- all the data you collect in the programme will be associated with your setting, allowing you to measure nature gains on your site
- your setting will be visible on the Nature Park map, as part of the community
- you will find out the size of your site and this figure will be added to the total size of the Nature Park
You need to be registered and logged in to complete this activity.
Please note that your site boundary should include all of the indoor and outdoor space.
If you find that the relevant site boundary or boundaries have been drawn for your setting, please do not draw over them. If you find a boundary has been drawn incorrectly, you can edit the boundary using this tool.
Preparation
What you need
- Your setting's Unique Reference Number (URN) - the number assigned to your setting by the Department for Education. The Site Boundary Creator tool provides links so you can look up your URN. For nurseries, please add the letter N to the start of your URN.
- your school address
- a computer with internet access
- a knowledge of your setting's site boundary - all of the indoor and outdoor space
Resources
Site Boundary Creator Guide.pdf
2.05 MB
Step by step
Watch our video tutorial below that shows the step-by-step process of creating your site boundary.
- Access the site boundary creator tool.
You can do this using the 'Begin activity' button. - Find your URN.
If you don’t already have your setting’s URN to hand, links provided in the first pop-up screen in the tool will help you find it. - Check you are in the right location on the map.
When you open the Site Boundary Creator, the map will zoom to your setting location based on the information you provided when you registered. In some cases, the map may zoom to a location a bit further down the road, so make sure you are in the right place before you get started. You can move around the map like you would in google maps (dragging the screen with your cursor), or use the search button to look for a postcode or address, if you need to correct your location. - Draw a line around the outside boundary of your educational setting’s site.
In the tool there is a ‘Create features’ section on the right-hand side. In this section, when you click on “Education Site Boundary” you will be able to place dots along the boundary of your school site (like making a dot-to-dot picture). The tool will automatically join the dots for you, as you go, creating a shape of the boundary of your site. Double click to finish your outline. This outline should include your whole site (encompassing all buildings, carparks etc) not just the outdoor or green areas. Please do not use the freehand function to draw your boundary. - Check and edit your boundary.
When you have finished drawing the boundary you can then make some changes if you need to. You can move around the dots that you created, move the whole shape across the map, or make the shape bigger, smaller, narrower or wider, just like moving a shape you have drawn in a Word or Powerpoint document. - Add your educational setting’s URN.
When you are happy with your boundary, you then need to input your setting’s URN. This will automatically attach your setting’s name, postcode and phase of education to the shape you have created, based on the information you provided when you registered. Adding your URN ensures that we can link all the data you collect within this boundary to your educational setting, meaning you can view and measure your nature gains. If you are a nursery, you must add the letter N in front of your URN e.g. N100100. - Submit your boundary.
Confirm that ‘Yes’ your boundary is correct and click ‘Create’ to submit your information. If your site is divided across more than one location, you can now repeat steps 3-6 for each area of land. - Mark this activity as complete here on the website.
Last but not least, head back here to mark this activity as complete.
If you need to edit your site boundary after completing the activity please watch our video on How to edit your site boundary.
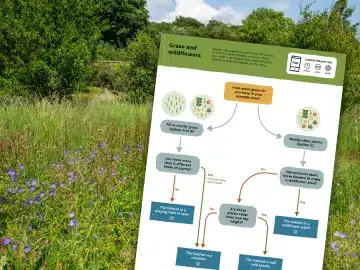
What to try next
Explore and map the habitats your site offers for nature to mark the starting point in your Nature Park journey
Image
Habitat Heroes
Begin activityImage